SOLTEC•HEALTH
SUPPORT
Getting started with SOLTEC•HEALTH
Parts List
(1) Power Cable & Adapter (Assemble these two components first, firmly insert the power cord into) Z•GEN
(1) Z•GEN
(1) Z•TRACK
(1) Power Cord
(1) Charging Cord
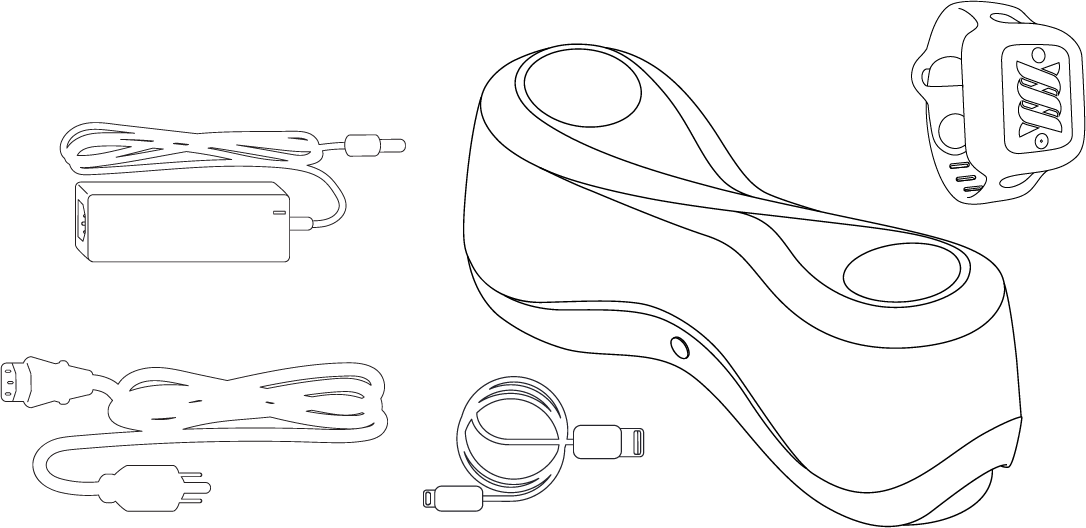
When you open the box, you should see the following contents:
Z•GEN
Z•TRACK and a smaller band
USB Charging Cord for Z•TRACK
Power brick & Wall cord
The first thing you will want to do with your new SOLTEC•HEALTH System is to charge your Z•TRACK.
Connect your Z•TRACK with the included USB charging cord and plug in the device until fully charged. The blue light on the front of the device will pulse slowly when the device is charging and turn off when fully charged.
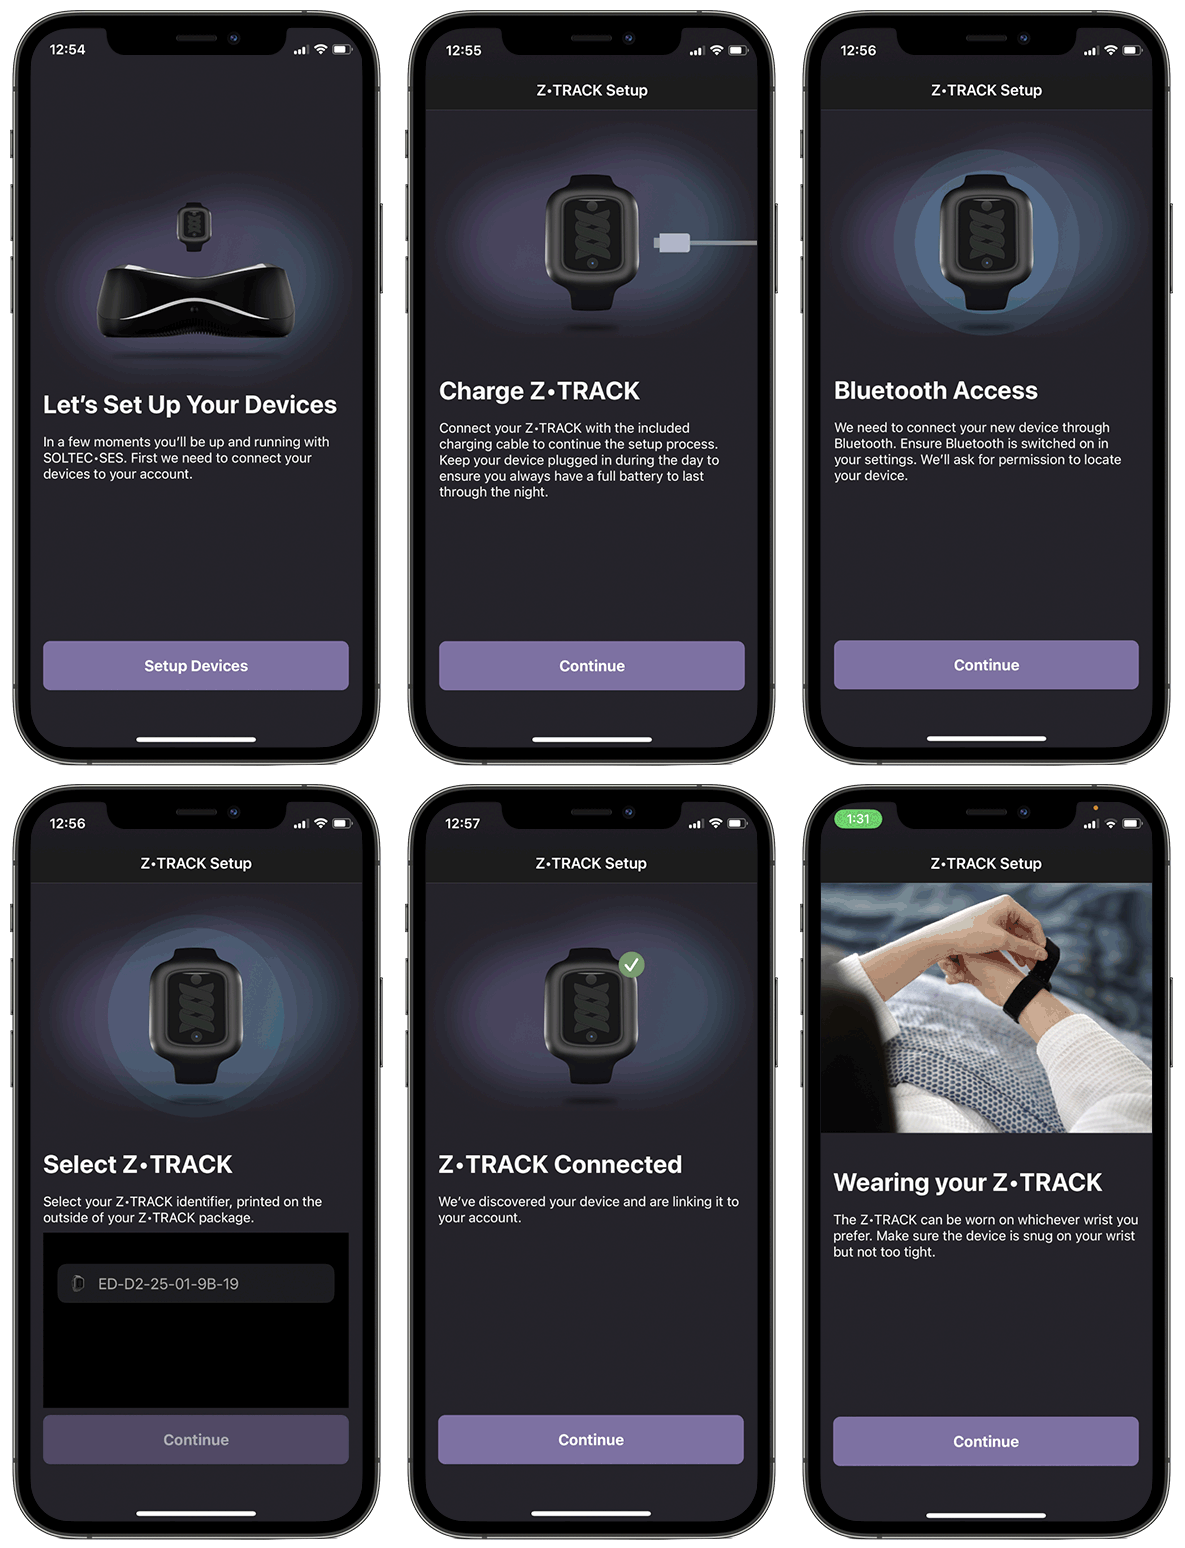
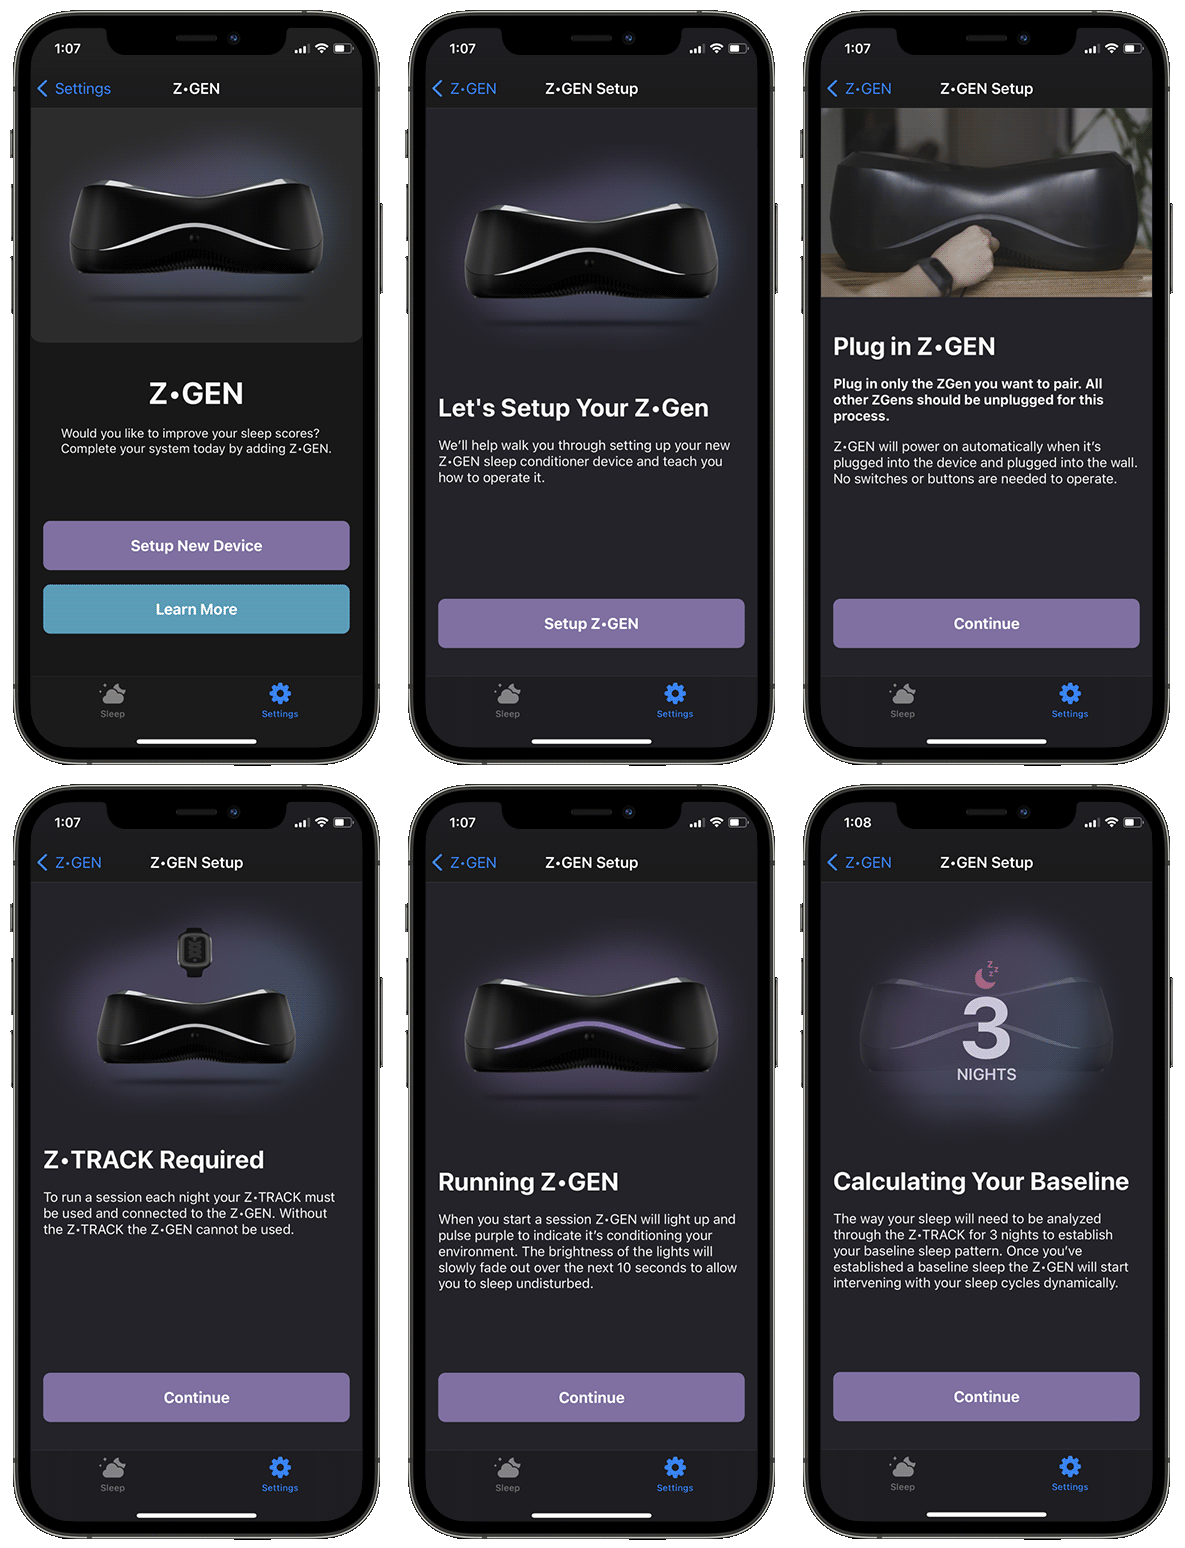
Time to Pair your Z•TRACK and Z•GEN in the SOLTEC•Z app. Please follow along with the detailed instruction screens in the app. It is important that you allow Bluetooth access when prompted as the SOLTEC•HEALTH requires Bluetooth to function.
SOLTEC•HEALTH Hardware Setup
• Before starting this step, bring your system to a chair or couch where you read or watch TV. This will get you ready for the initial hardware setup.
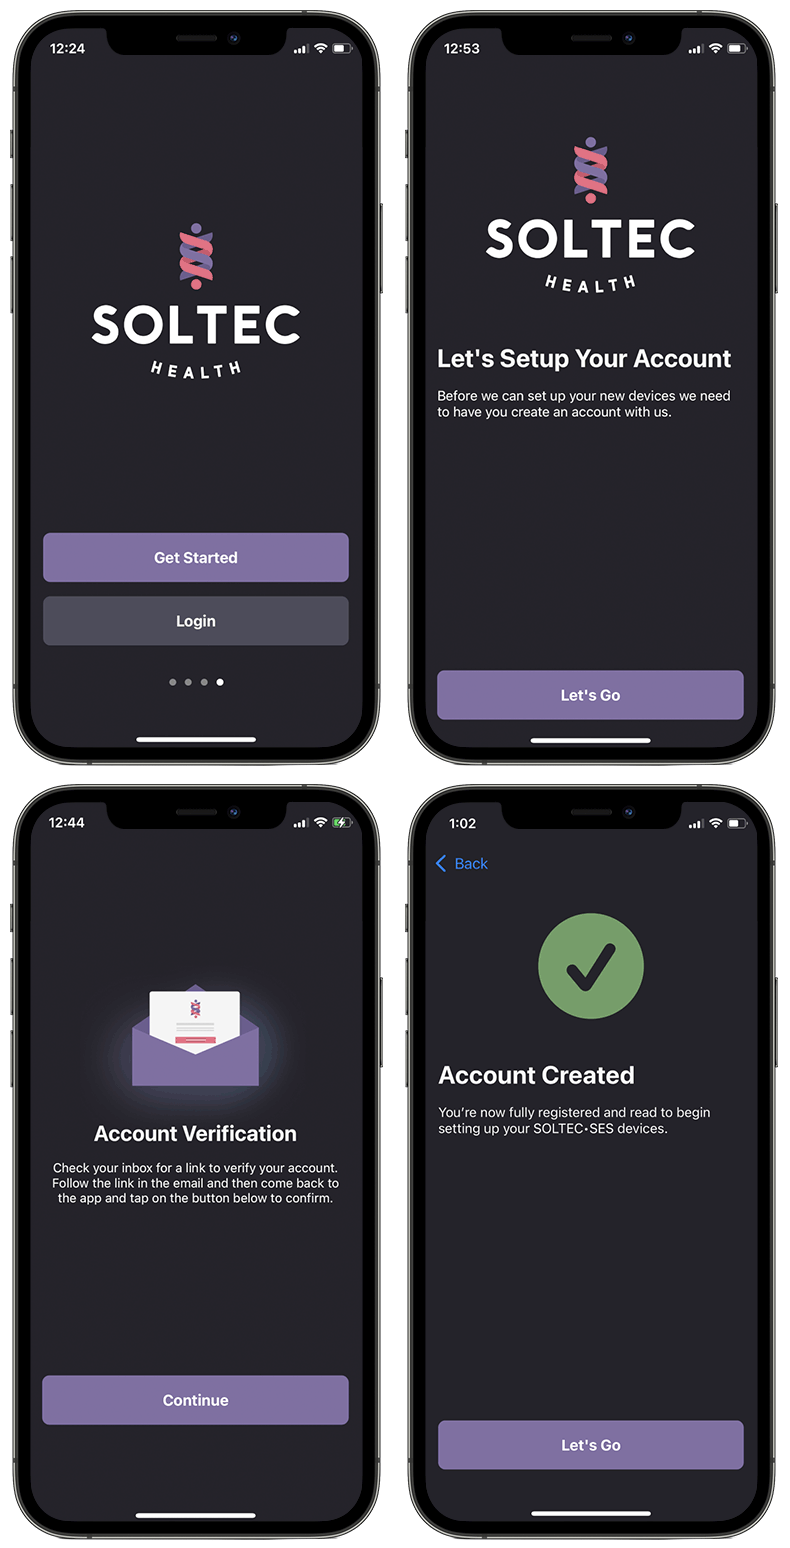
• The next step is to download the SOLTEC•Z App in the Apple app store or Google play store and create your account.
• It is now time to Pair your Z•TRACK and Z•GEN in the SOLTEC•Z App. Please follow along with the detailed instruction screens in the app. It is important that you allow Bluetooth access when prompted as the SOLTEC•HEALTH requires Bluetooth to function.
• When pairing both the Z•TRACK and Z•GEN, please remember to click the serial number before hitting continue.
• Your Z•GEN should be plugged in and Z•TRACK should be on your wrist. You should also have the SOLTEC•Z App downloaded and registration should have been completed.
Setting up SOLTEC•Z and Z•TRACK
Connect your Z•TRACK with included charging cord and plug in the device until fully charged.
The blue light on the front of the device will pulse slowly when the device is charging and stop pulsing once fully charged.
Downloading SOLTEC•Z and Pairing
Please download SOLTEC•Z in the Apple App Store or Google Play. To verify your account, your email address must match the address provided for your membership. You may need to check your junk email folder to find the account verification email.
Let’s setup your account, before you can set up your new devices we need to have you create your account in the SOLTEC•Z App. Follow the instructions in the app to pair Z•TRACK via Bluetooth. Follow the instructions in the app to pair Z•GEN via Bluetooth.
Wearing Z•TRACK
Z•TRACK can be worn on whichever wrist you prefer. Make sure the device is snug but not too tight.
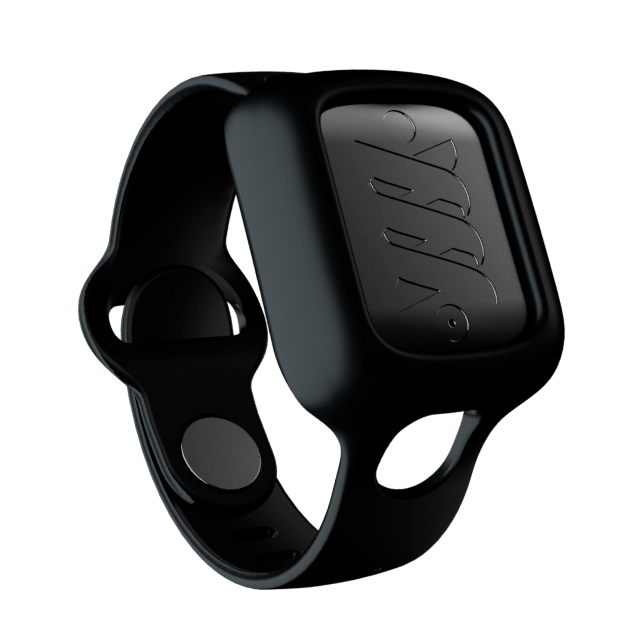
When putting on your Z•TRACK, select whichever wrist is most comfortable for you. Curl the band around your wrist then securely thread the peg through the nearest adjustment hole. Make sure that the setting you choose is “snug”. You want to make sure that the band is not too tight or too loose. Secure the remainder of the band by sliding it through the buckle loop (open slot).
Setting up Z•GEN
Insert cord into Z•GEN.

Plug the power cord into a wall outlet.

Where to Place Z•GEN Unit
Place Z•GEN under your bed near your feet. Position unit with the button facing out and the power cord towards the head of the bed.
Run a Relaxation Session
• The next step is to have a 30-minute relaxation session to complete your initial hardware setup. Scroll to the bottom of the “My Night” screen and you will find the “Get Started” button under “Relax (currently feeling stressed)”.
• You can do this now or later today, but it’s important to complete this step prior to beginning your 5-night Baseline period. This step establishes a connection with your body and will track your heart rate during this session. This session, plus your 5-night baseline, will ensure calibration of your system.
• Z•GEN will stay dormant while sleeping until 5 nights of baseline has been established.
Running a Stress Reduction Session in SOLTEC•Z
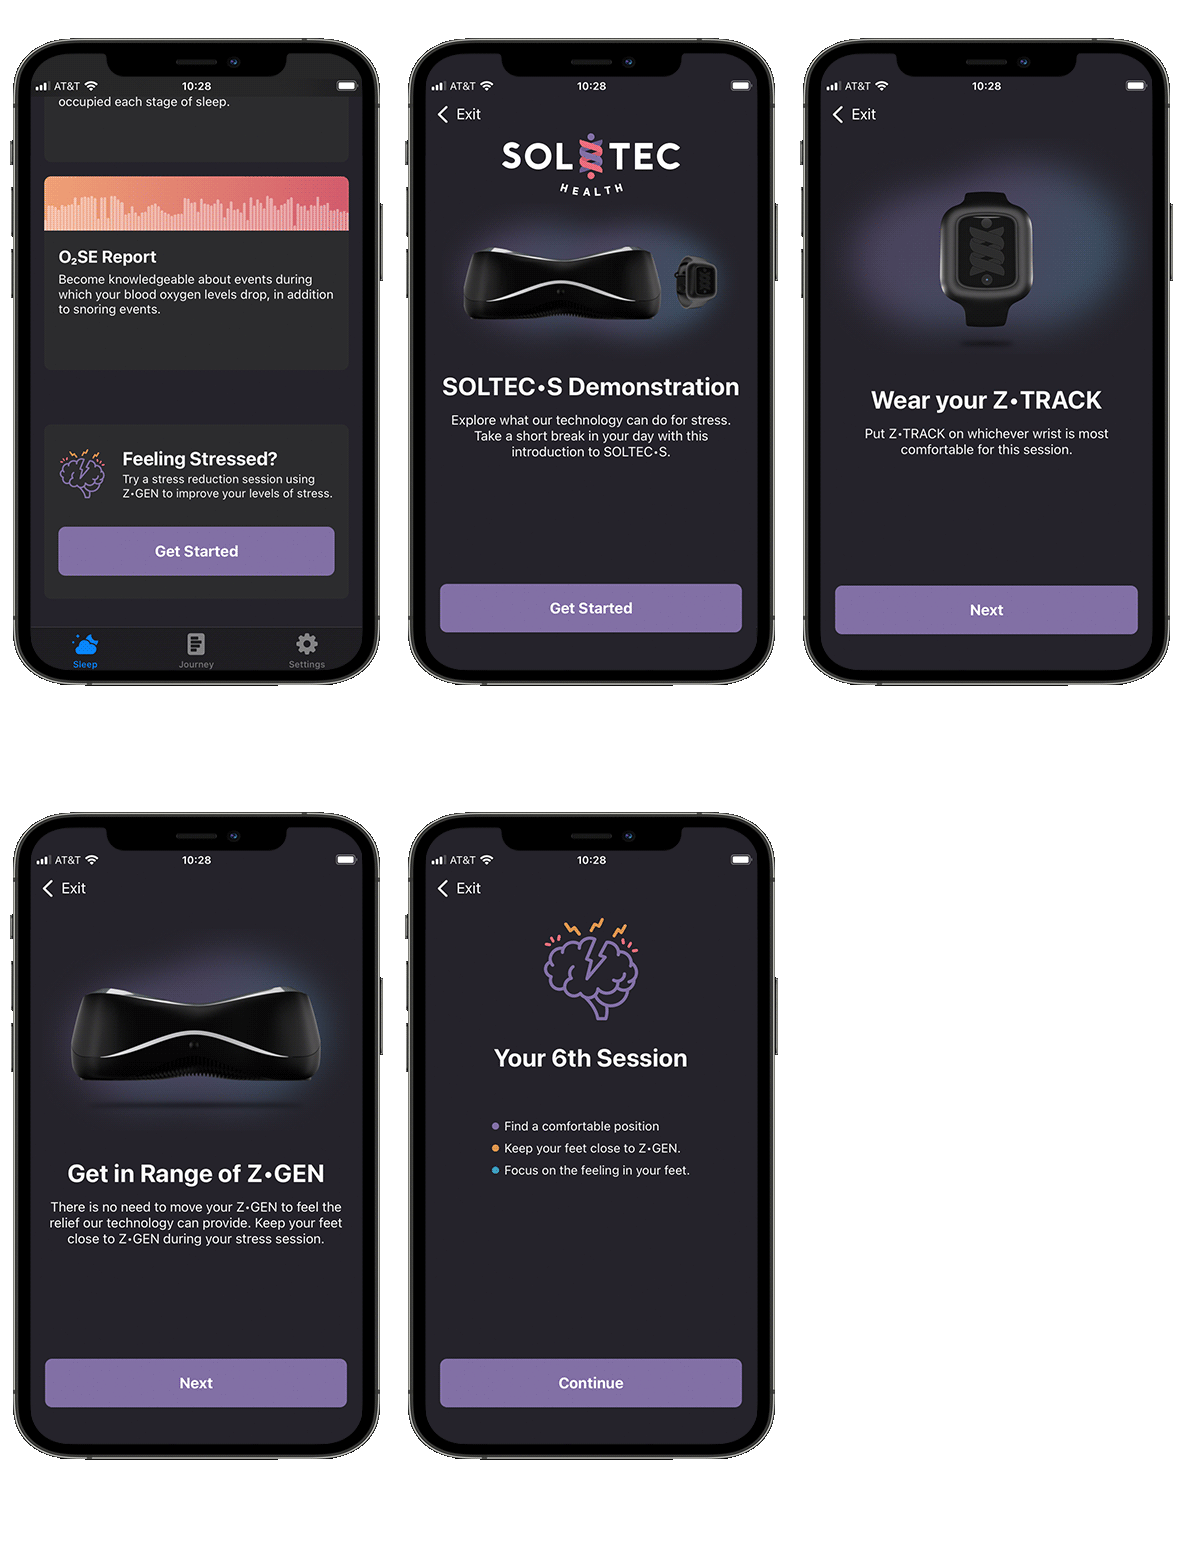
Put your Z•TRACK on whichever wrist is most comfortable. In SOLTEC•Z, under the sleep tab, scroll down to the section “Feeling Stressed”. Start a stress reduction session using SOLTEC•HEALTH system to relieve stress. Press the “Get Started” button.
Follow the next three app screens and click “Continue”. Place your feet within three feet of Z•GEN.
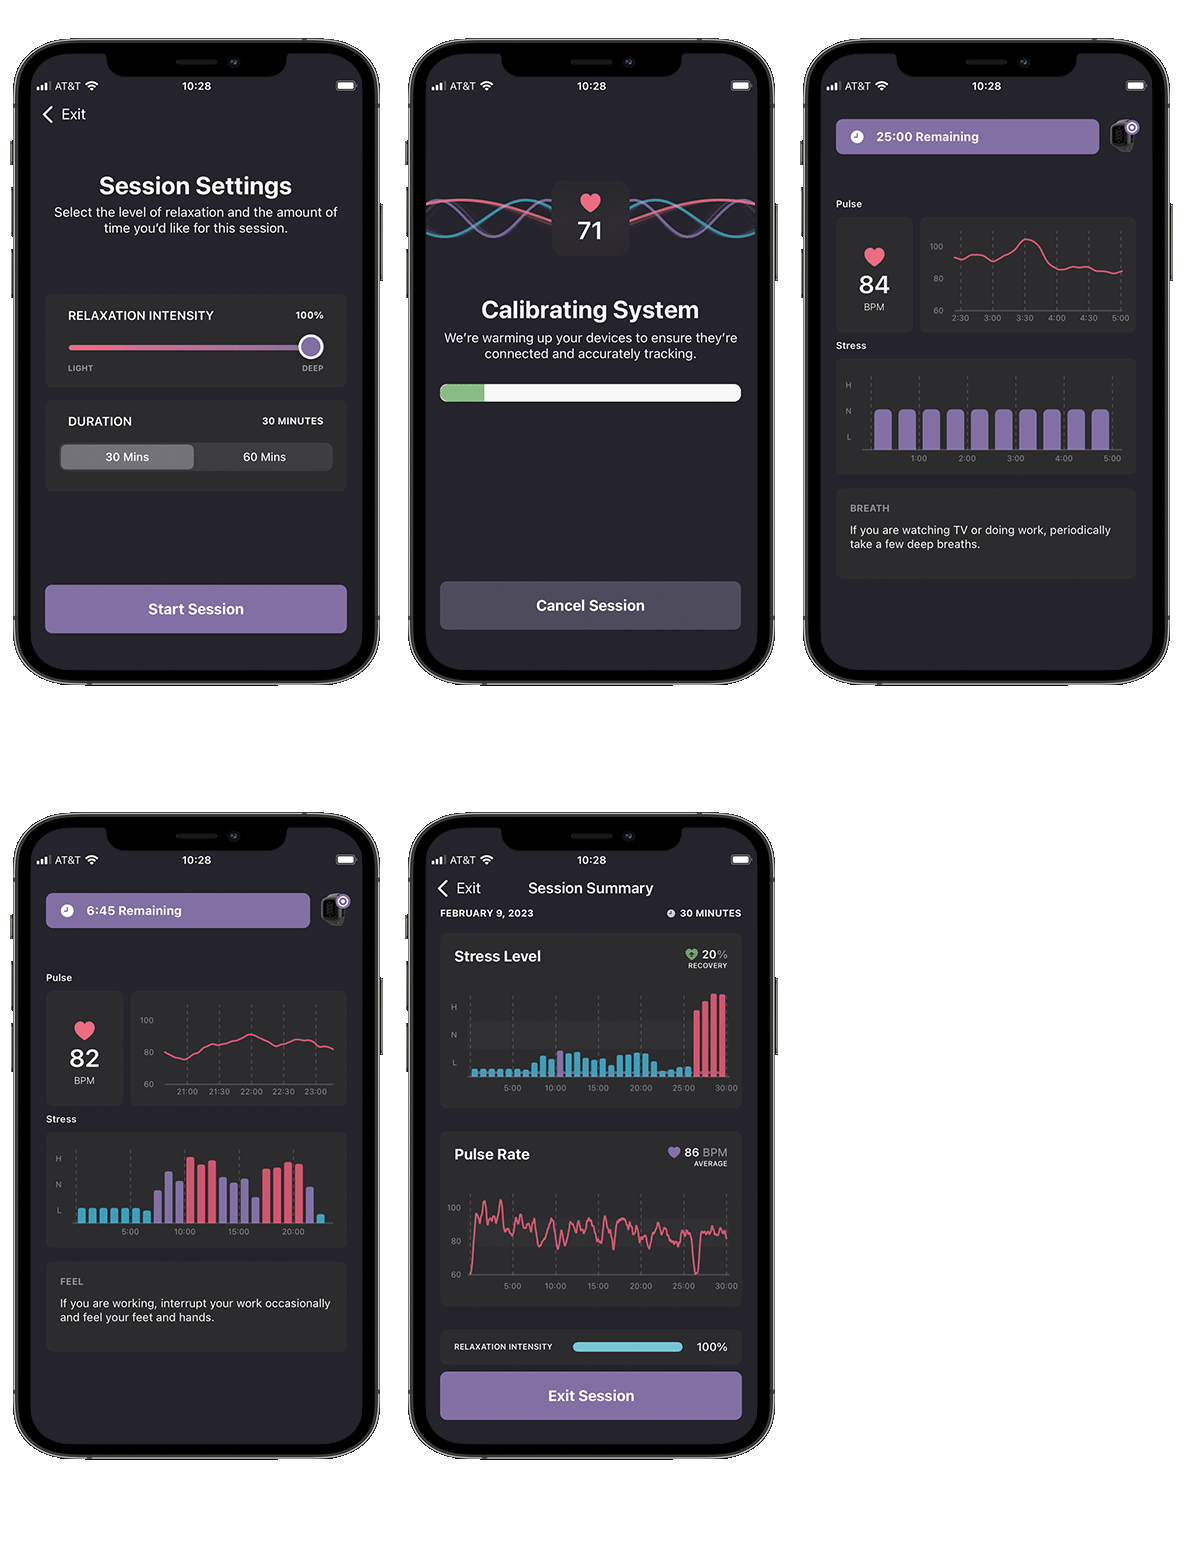
Next in “Session Settings” select the intensity of relaxation and either a 30 or 60-minute session and press the “Start Session” button.
Using SOLTEC•Z
Navigating SOLTEC•Z
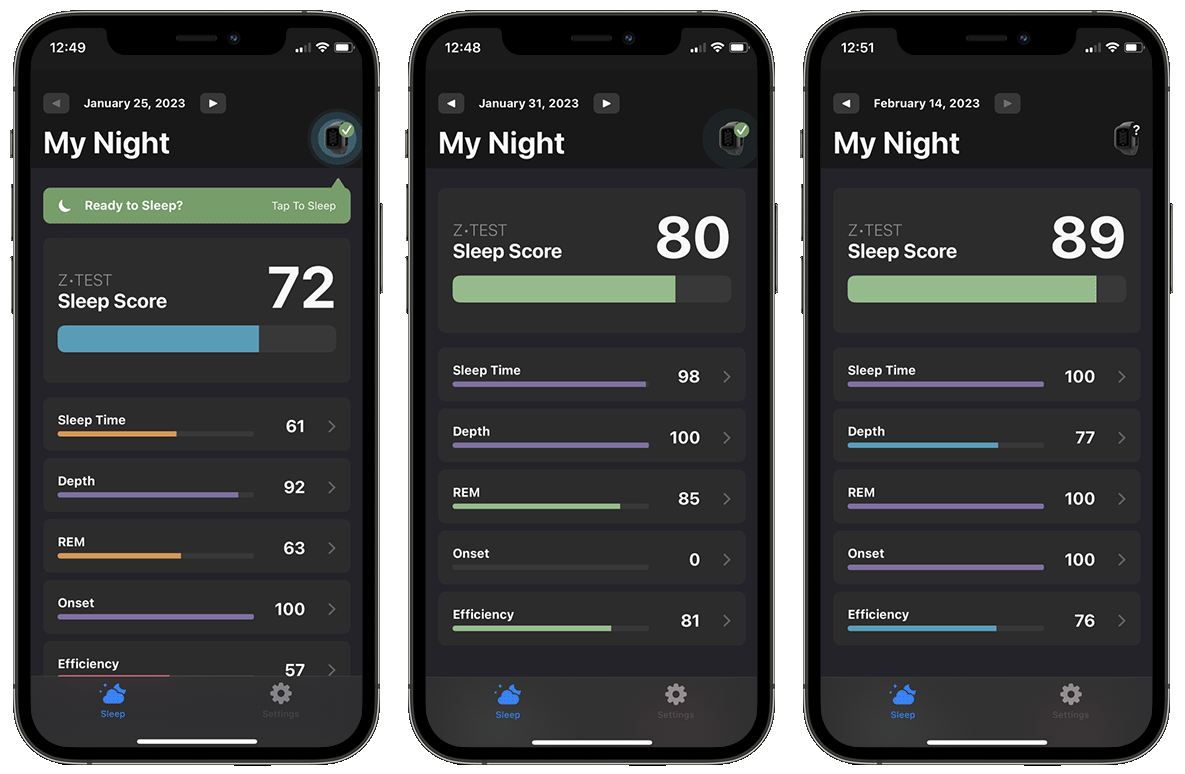
Viewing “My Night” Sleep Scores
How to Run a Sleep Session
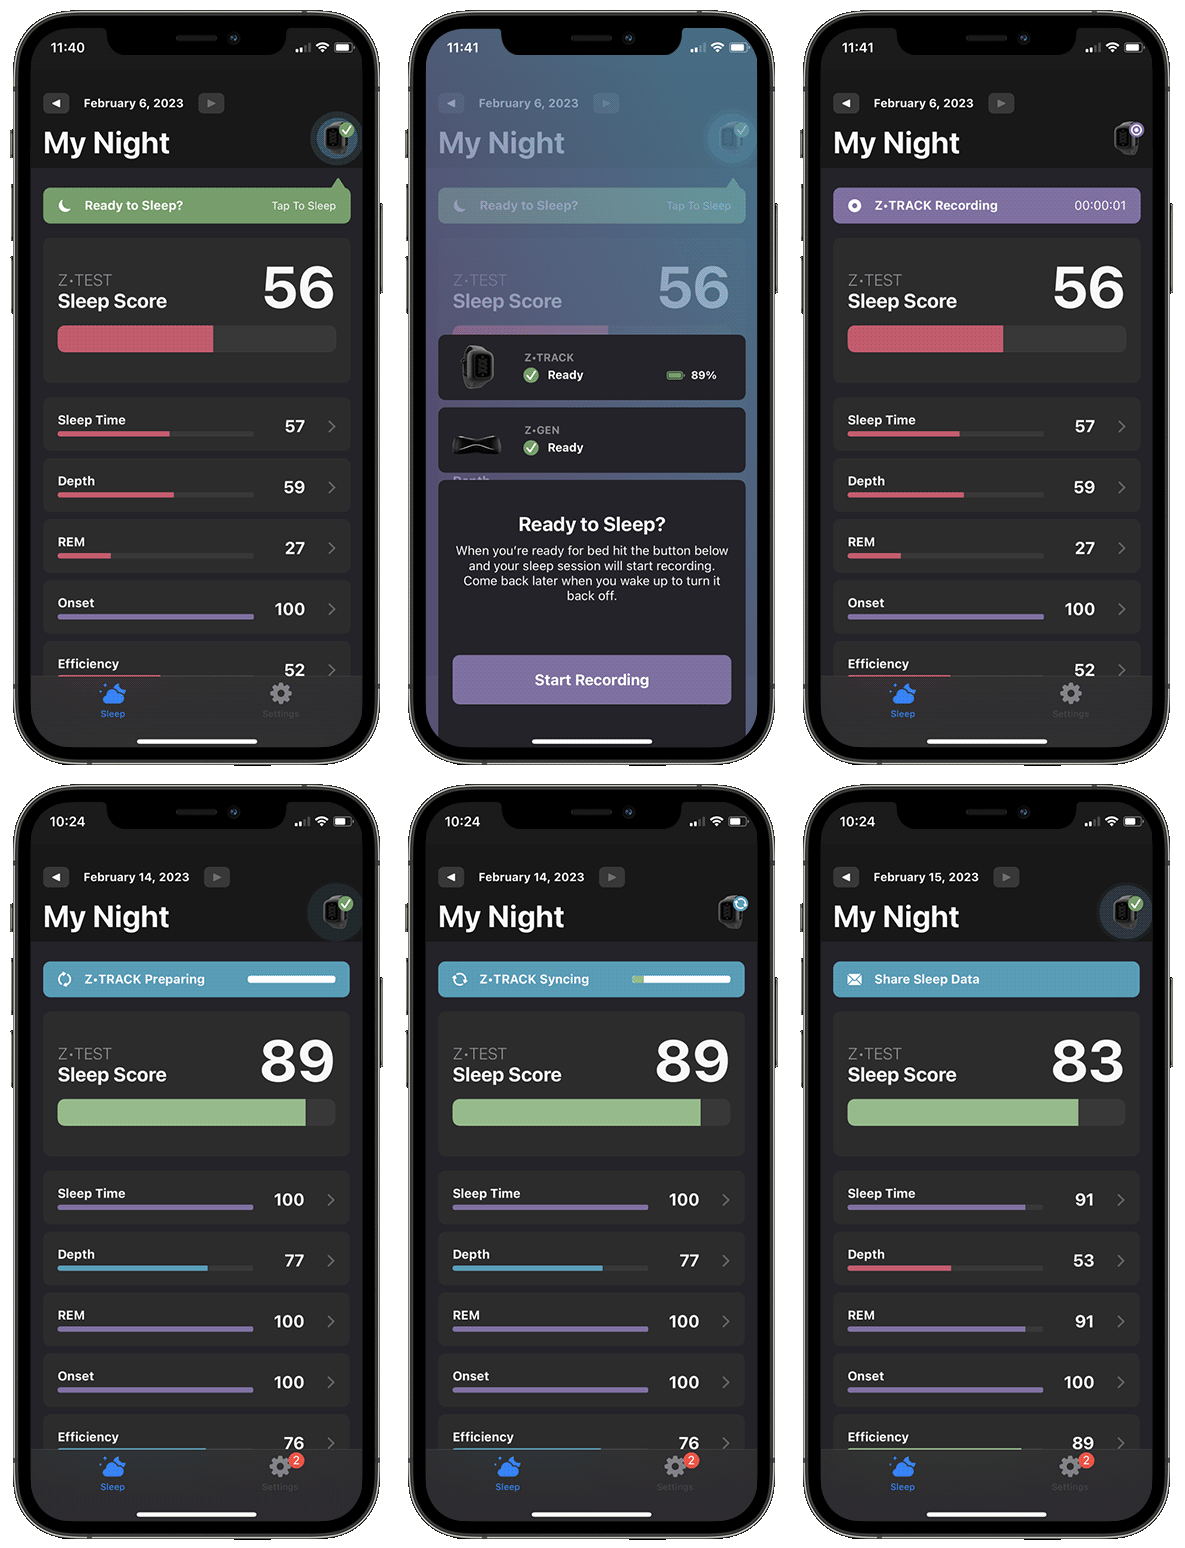
Open SOLTEC•Z and under the sleep tab at the top of the screen you will see “My Night”.
In the upper right, tap the icon of Z•TRACK. This will show the “Ready to Sleep” menu. Both the Z•TRACK and Z•GEN should show green check marks when connected. Tap the “Ready to Sleep” button when you are ready to start a sleep session.
Time to Rest
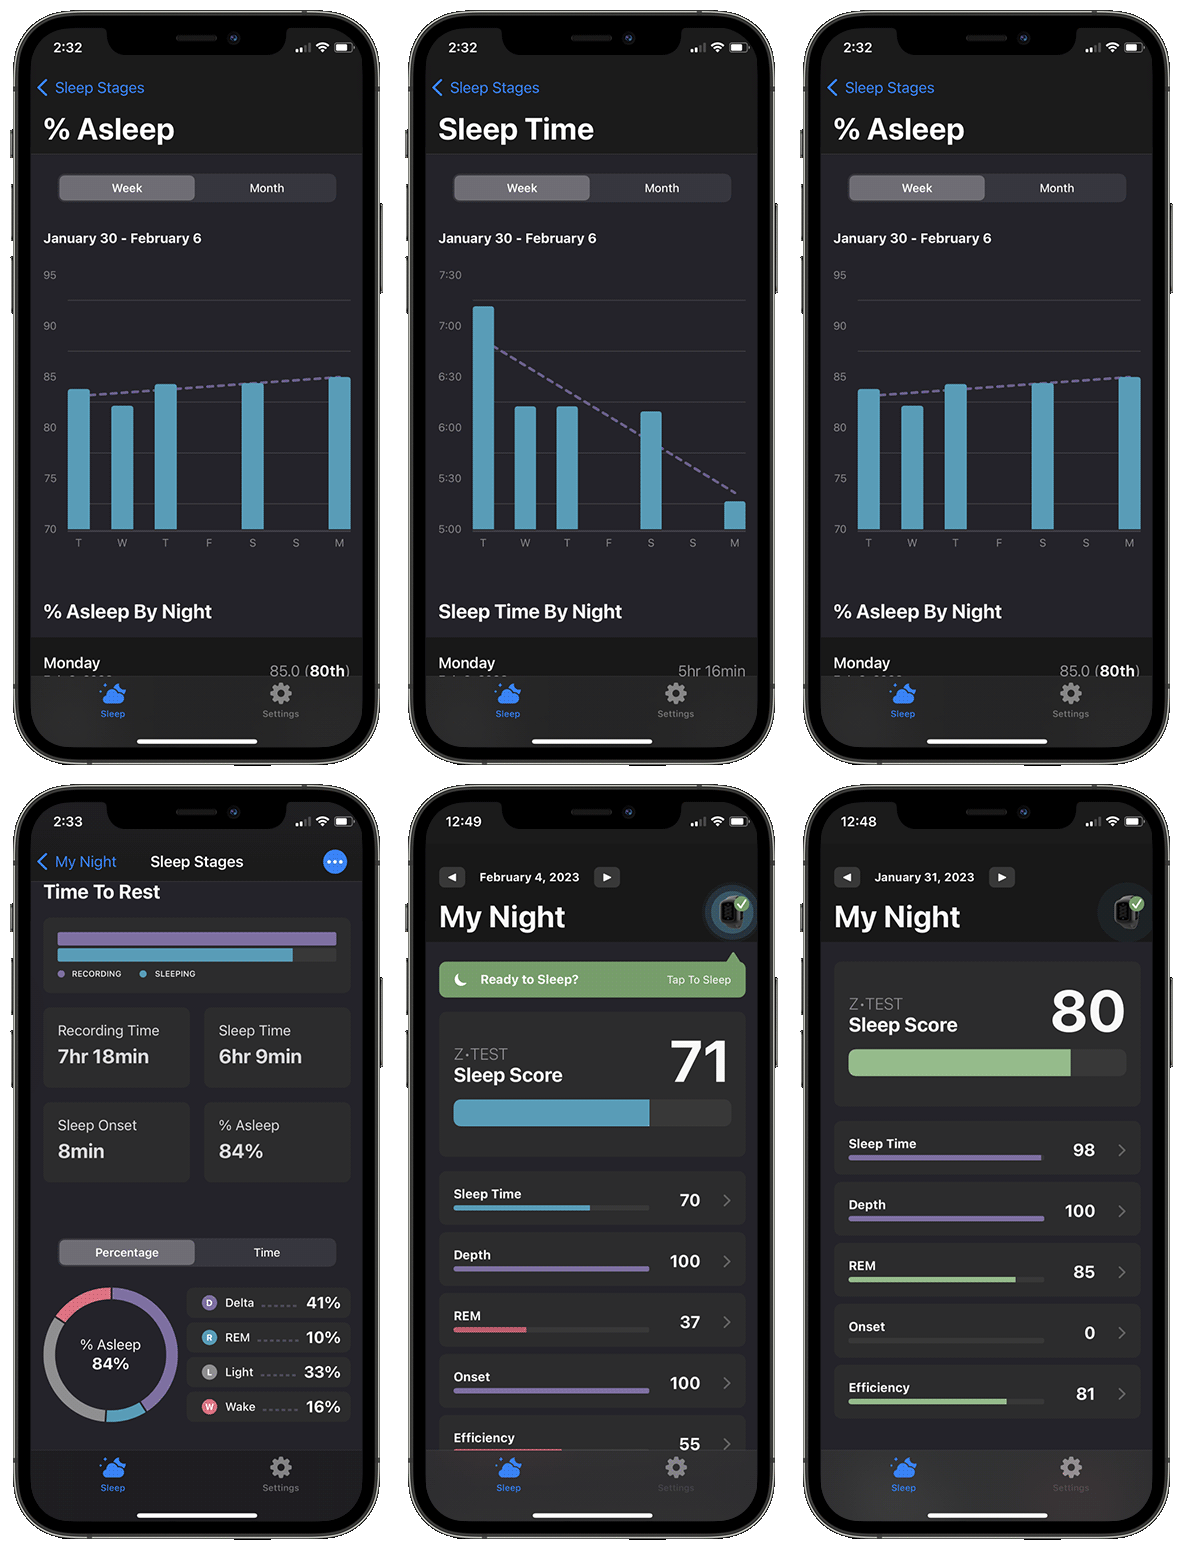
The Time to Rest graphic and numeric report, graphically and numerically shows the amount of Recording and Sleep Time, in addition to the Sleep Onset (how long it took to fall asleep) and the percentage of time during the recording that the user was asleep (% Sleeping).
To obtain a Sleep Time sub-score of 100, your Sleep Time needs to be at least 7 hours and 30 minutes. This means time asleep, not just time in bed.
Device Requirements
• The IOS requirement is 15.6, though we recommend the iPhone 8 and newer.
• The Android requirement is 6.0 (API level 23) Marshmallow or higher mobile phones that have Bluetooth capabilities.
• Tablets are supported, though the UI is optimized for phone screen sizes.
Sleep Stages Report
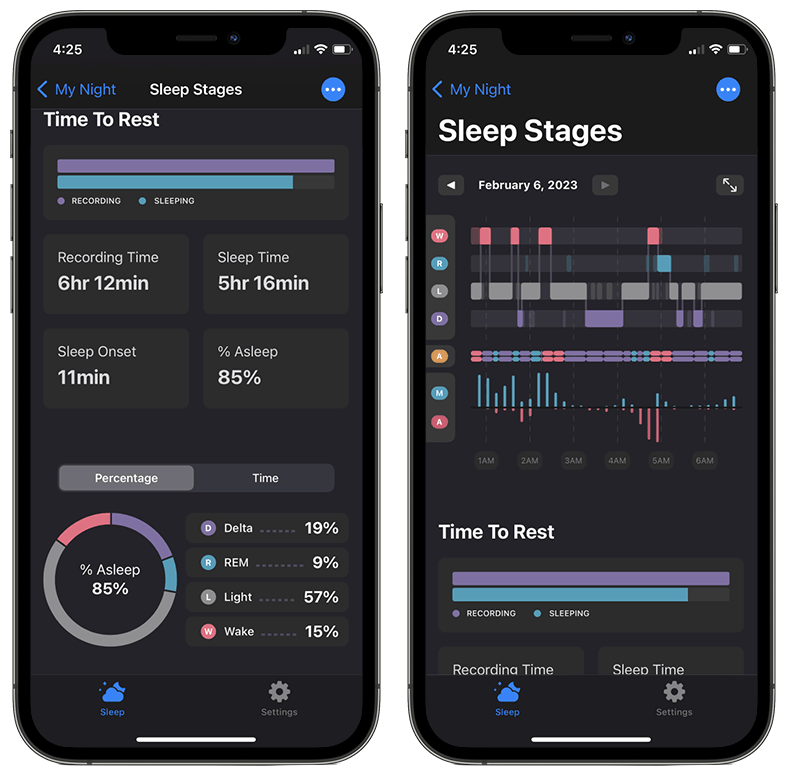
The sleep stages report breaks down your night’s sleep in real time. Dividing what percentage and amount of time of each stage of sleep you were in. The graphic is called a sleep histogram. It displays the user’s state during their time in bed.
(W) Wake is on top followed by the sleep stages; (R) REM or dream, (L) Light, and (D) Deep or sleep.
Notice how Deep sleep predominates earlier in the session and REM predominates later. Light sleep generally represents the majority of the night, roughly half. This night’s sleep was interrupted by a number of awakenings.
Below that, the blue bars represent movements. Notice how more significant movements accompany awakenings. The pink bars represent small arousals that often occur independent of and are not as significant as awakenings.
The adjustment markers in the graphic represent the instructions issued by Z•TRACK to Z•GEN during the night, which alters the stimulus frequencies. This horizontal, detailed version of the sleep histogram can be viewed by pressing on the arrows at the top right of the screen.
Settings Page
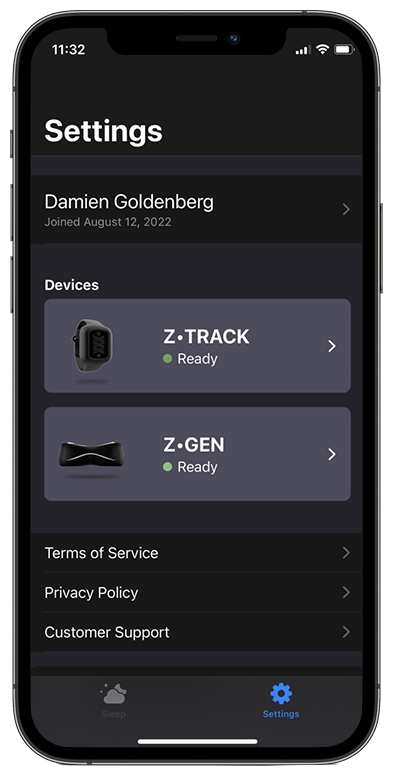
At the top of the settings page, you will see your name and it will have the date you joined. When you press on your name it will have your personal information.
Under that it will show your devices Z·TRACK and Z·GEN. When you press on the Z·TRACK it will tell you the status, Battery Level, Last Sync, Serial Number and Firmware Version.
When you press on the Z·GEN it will give you the Status, Serial Number and Firmware Version. Below that you will Lighting & Brightness. You can change Z·GEN brightness and night light preference.
When pressing on the Z·GEN Lighting button it will bring up a screen that allows you to make the adjustments you would like.
• Lighting
You will have three options:
Always- Keep the light on
Nightlight- Soft light for sleep
Darken- Go dark when quiet.
• Brightness
Is your Z·GEN a little too bright when it starts up at night? Are you able to see the lights under your bed? Slide the bar to the left if you want a dimmer experience and to the right if you need it brighter.
Z·GEN Lighting Guide
Are you seeing your Z·GEN light up in different ways and wondering what they mean?
Follow our guide on the Z·GEN lighting. (Press the Lights Explained button)
Z·GEN Powered on
Z·GEN will show a solid green light when the device is plugged in and awaiting a connection with Z-TRACK.
Z·TRACK + Z·GEN Connected
The blue light means your Z·TRACK has successfully connected and you’re ready for a night of conditioned sleep.
Session in Progress
When you start a session Z·GEN will light up and pulse purple to indicate it’s conditioning your environment.
The brightness of the lights will slowly fade out over the next 10 seconds to allow you to sleep undisturbed.
Mechanical Problem
If there’s a problem with the internal hardware of Z·GEN it will flash red to let you know to contact support for help with servicing your device.
Customer Support
For general questions please email: [email protected]
Please fill out this form if you require assistance with any component of your SOLTEC·HEALTH System.
You should receive a response within 48 hours.
*You must use your membership email address in the email line of the online support form. Support requests that are not tied to a membership email will be discarded.
Contact Support
If you require additional support on any topic not listed, we encourage you to reach out and speak with us.
Schedule Appointment
The SOLTEC•HEALTH System is not intended to diagnose, treat, cure or prevent disease and should not be used as a substitute for professional medical advice, diagnosis or treatment. All content available through the products and services of SOLTEC•HEALTH is for general informational purposes only. This product and system protected by one or more of the following patents: U.S. Pat. Nos. 9,949,004; 11,478,604; and other U.S. and foreign patents pending and issued.
